
Over the course of 2018 websites developed in the legacy DryDock environment were all converted to the newer Backstage environment. The following directions are for setting up Dreamweaver to connect to the development environment called Backstage.
Your technical coordinator can assist with setup, it is recommended you have the latest version of Dreamweaver if you choose to use that application to maintain your website.
Are you ready? Great! Let’s make that connection! These examples assume you are on campus connected to the network, and that cehdhelp@umn.edu has granted access along with a shortcut to your site in the development environment. Keep that handy as you will need it for setup.
For our examples we will use:
New way: backstage.cehd.umn.edu/Jeffreology$
(the shortcut from cehdhelp@umn.edu)
Preflight Instructions
Mac users need to have OS 10.5 or higher and will need to log on to the development server before starting Dreamweaver, this connection will always need to be made before using Dreamweaver with a development environment on the Mac platform. Windows machines issued by the college can skip step this provided they are on campus and connected to the network.
Remember if you are off campus you need to make a VPN connection to the University first.
Mac Connection
- From the finder (desktop) top menu, select Go then Connect to Server
- In the dialogue box that appears, for server address use that shortcut from cehdhelp@umn.edu:
- smb://backstage.cehd.umn.edu/Jeffreology$
- smb://backstage.cehd.umn.edu/Jeffreology$
- Add this site as a favorite with the plus sign
(You’ll appreciate this next time) - Click Connect
- On the login dialogue box
- Name: your x500
- Password: your x500 password
- Click OK
- You are now ready to open Dreamweaver!
- To have your Mac load up the development environment every time you start up your mac (way easier way to do it). Open up the “Accounts” panel in system preferences, and drag the shared drive into your start up items.
Dreamweaver Connection
You did connect to the server first if you are on a Mac right? 🙂
Fire up Dreamweaver, go to top menu Site then New Site… You will now get the site set up dialogue box. The following instructions take you through the four setting steps on the left side of the dialogue box.
Site
- Site Name:
- Uh… name it after your site! In this case Jeffreology
- Local Site Folder:
- Windows users can put this on their C drive and you can use the folder icon to the right to browse for a location. If you plan to host multiple sites I recommend making one folder to house all of them, like this:
C:\DW Websites\Jeffreology
Notice I can use spaces in the name for my local folders.
Servers
A few steps here, but all easy! First, click the plus sign to add a server. It is right above the help button and next to the minus, pencil (edit), and paper (copy) icons. A new panel will open with two tabs, Basic and Advanced.
Basic
- Server Name:
- Jeffreology (use your own site name of course!)
- Connect Using:
- Local/Network
- Server Folder:
- Windows use:
\\backstage.cehd.umn.edu\Jeffreology$ - Mac use: the browse button to the right of the input field. You will now browse to the development environment connection and select your folder from inside. In this case I would select “Jeffreology”
- Web URL:
- http://backstage.cehd.umn.edu/Jeffreology/
Advanced
Remote Server section: check all four boxes.
- Check-out Name:
- This will appear on files you are editing, so keep it real and professional.
- Email Address:
- This allows people to email you if they need you to check a file back in.
Testing Server section.
- Server Model:
- ASP JavaScript
- Check boxes (for CC 2017)
- Select both:
– Automatically push files to testing server
– Always auto save dependent files
After Server Pop-up Window Closes
For Dreamweaver Creative Cloud 2017 & 2018:
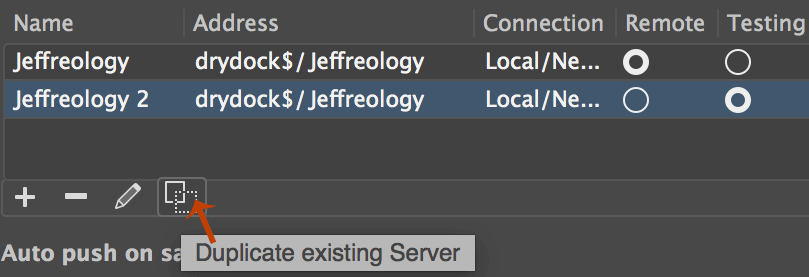
When you click save on the secondary server pop-up window you will only have one server set up as remote. You need a second one for testing. Fortunately it is as easy as clicking the duplicate existing server button. It will make a second one for testing, nothing else to do except click save!
For Dreamweaver Creative Cloud 2015:
When you click save on the secondary server pop-up window, check to make sure the server is set the correct way. Your testing and remote servers will be separated into two separate categories. Seems tricky? Nope! Just selected the Testing space for your testing server and the Remote space for your remote server.

For Dreamweaver 2014 and older:
Connection for Dreamweaver 2014 is much the same. When you click save on the secondary server pop-up window, check to make sure the server is set as the remote and testing server. Many times just the remote box is checked, you want both boxes checked.

Leaving the testing box un-checked will cause annoying problems; no ability to preview asp includes or test a page in a browser for example. Booooo.
Version Control
Nothing needs to be set here.
Advanced Settings
This has many subsections, you only need to set three.
- Design Notes
- Check both maintain design notes and enable upload design notes for sharing.
- Contribute
- Nope! Adobe stopped supporting this years ago.
- Templates
- Check the box: Don’t rewrite relative document paths
That’s it!
Click save, because you are done and ready to work with your files!